Basic Usage Instructions
Configuring Erin
To start using Erin, we to get some configuration details. First let’s make sure Erin is installed.
$ erin -V
Looks good! So, we need to head over to the discord developers portal and create our application by clicking on “New Application”.

Next, we need to initialize the project scaffolding so we don’t have to start from scratch. Just hit ENTER for the options you are unsure about.
$ erin scaffold
Enter the details for your project below!
Project Name [Bot]: Ping Bot
Project Slug [bot]: ping_bot
Version Number [0.0.0.dev0]: 0.1.0.dev0
Configuration File Name [config.toml]:
This will create a folder named ping_bot in the directory where you ran the command. Open and edit the configuration file as per your needs. It should look something like this:
[bot]
token = ""
debug = false
project = "ping_bot"
plugins_folder = "plugins"
log_type = "Timed"
log_level = "Info"


[database]

enabled = false  # Change this if your bot will use the database
driver= "mongo"

#uri = "mongodb://myDBReader:D1fficultP%40ssw0rd@mongodb0.example.com:27017/admin"

#################################################################################
# If you filled 'uri', then you can ignore the rest of the database configuration.
##################################################################################

#host = ["myvps.com"] # This can also be a list of hosts (including replica sets)
#port = 27017
#username = "pingbot"
#password = "ilov3bacon"
#database = "pingbot"
#replica_set = "rs0"  # This is needed added when using replica sets

[global]

name = "Ping Bot"
prefixes = [">"]
description = ""

[help]

color = 0x6C5CE7
support_text = """
Need further help? Ping us at our [support server](https://discord.gg/dRUPaRr)!
"""
To fill this out (eg: token) we need to know some details about our discord bot user. Simply going to the “Bot” tab and clicking “Add Bot” will do the job.

Next click to reveal the token.
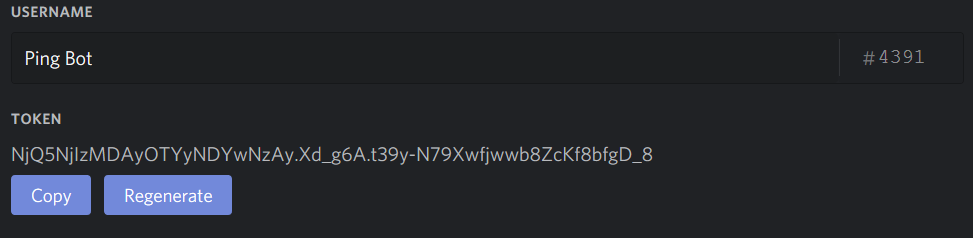
Make sure to copy this token down!
For now we won’t be delving in making our bot public and we’ll stick to using our bot privately in a server of our choice.
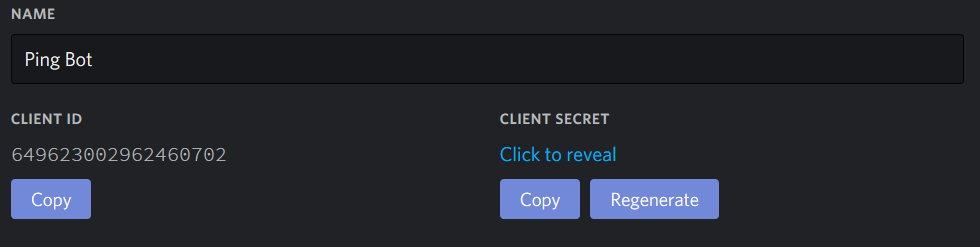
Save your changes and use this link replacing BOT_CLIENT_ID with your bot’s client ID to invite Erin to our server,
Invite Link : https://discordapp.com/api/oauth2/authorize?client_id=BOT_CLIENT_ID&permissions=0&scope=bot
You can get the client ID from your bot’s app page.
Now that we have all the details, we can start filling in our config file. It should look something like this. You should also already have your database connection details. If not, read Configuring a database.
[bot]
token = "NjQ5NjIzMDAyOTYyNDYwNzAy.Xd_g6A.t39y-N79Xwfjwwb8ZcKf8bfgD_8"
debug = true  # Set to true to see debug logs for the discord client
project = "ping_bot"
plugins_folder = "plugins"
log_type = "Timed"
log_level = "Info"


[database]

enabled = false  # Change this if your bot will use the database
driver= "mongo"

[global]

name = "Ping Bot"
prefixes = [">", "?"]
description = "Awesome bot that will ping you back!"

[help]

color = 0x6C5CE7
support_text = """
Need further help? Ping us at our [support server](https://discord.gg/cytVBaH)!
"""
Starting Erin
Now that we have a config file ready. Let’s save it is somewhere. By convention, it’s named config.toml.
Now let’s tell Erin to start by passing the path to this file as an argument.
erin start --log debug --config /path/to/config.toml
Congratulations! Your bot should now be online.